Creating Sales Orders
The process shown below allows the user of the system to manually create a sales order in response to a phone or fax order.
Follow the "New Sales Order" link as shown below.
This will bring up the following form for entry of the sales order information.
Select an Account Name to begin (all sales orders must have an account name selected).
Many of the Sales Order fields auto-populate with default information from the customer's Account. If the default information is not filled out in the Accounts module for the customer, the following will need to be manually selected on the order:
- "Shipping Method" and "Carrier" for shipping purposes.
- "Payment Method" to process payment (note that multiple payment types can be selected on the same order).
- "Bill To/Ship To" information.
- "Tax Method" to calculate the correct amount to bill the customer.
If the "Credit Limit" has been set for this Customer Account, the "Credit Available" in the Customer Account field automatically shows the remaining credit available to the customer based on pending Receivables.
- If there is no credit available when the order is created or modified (edited), the system will warn about the lack of credit and gives the user the choice of recording the order (overriding the limit) or not saving the order (and communicating this to the customer).
- The credit availability check considers the credit available as well as the status (paid or not) and amount of the current order.
In the "Product Details" area, the user can select the products to be included in this order.
- Products can be added to the order one at a time or in bulk, see this link for information on adding products to order in bulk.
- If a selected product is tracked by serial numbers (serialized inventory management), the specific stock item (by serial number) can be optionally selected here or deferred until the fulfillment (shipping) phase. In the case of serialized inventory, by default, product items have to be chosen one at a time (Quantity is set to 1) as separate line items in the order to enable serial number-based tracking.
- To enable the entry of multiple serialized product quantities on the sales order, please contact [email protected]. When this is enabled the quantity entered for selection will populate the sales order line items in that same quantity and the serial number can be selected for each item.
- If a selected product is tracked by Lot numbers (lot-tracked inventory management), the specific stock item (by Lot Number) can be optionally selected here or deferred until the fulfillment (shipping) phase.
- To enable the entry of auto-selection of Lot Number on the sales order, please contact [email protected]. When this is enabled, the Lot Numbers will populate the sales order line items automatically based on the Lots that are expiring first.
- If a selected product is not tracked by serial numbers or lot numbers, the stock item field can be ignored and the entire quantity of the order can be specified as one line item in the order.
- If the selected product is managed as a matrix item product, the product selection window will require selection of the product and the specific matrix item combination that should be included in the sales order.
- If a product is in/out of stock, the Inventory columns are highlighted in Green/Red depending on the stock availability for each line item ( only for unshipped SOs).
Payment can be accepted once all of the product, shipping, and tax details have been entered for the order.
- Select the payment method from the drop-down list and enter payment details. Click the "Paid" status box to indicate the order has been paid.
- If selecting Charge to Account as the payment status, do not mark the Paid status box or the order will not appear in the Receivables module.
- To process a credit card payment, please see these instructions. Please note that you do not have to save the order before processing the credit card, you can enter the credit card information and click save, do not click the paid status box as the system will do this for you automatically.
Click the "Save" button once all the information has been filled in for the Sales Order.
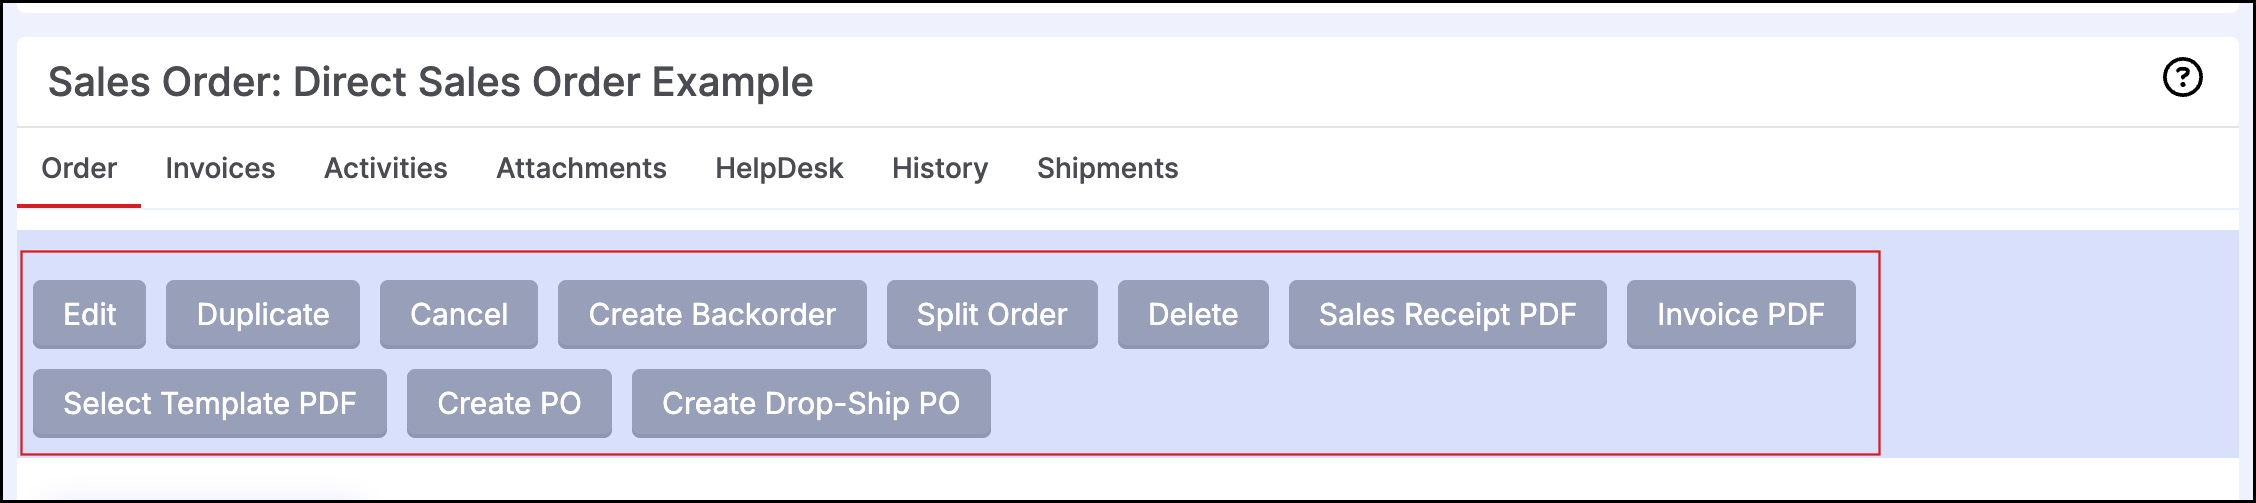
This will then display the Sales Order in the Detailed View (or Read-Only view) as shown in the image below.
Here you can then:
- Edit the order to make changes.
- Duplicate the order.
- Cancel the order, more information on this process here.
- Create Backorder(s), more information on this process here.
- Delete the order.
- Generate a Sales Receipt PDF for the order using the "Sales Receipt PDF" button.
- The PDF can be emailed to the customer directly or saved as a file.
- If emailing directly to the customer, the email template that is used can be found in "Settings > Templates > Email Sales Receipt". This template can be customized in the HTML editor section of the template(Enterprise and higher editions only).
- To email the PDF file, select "Email Template" to email the Account and/or related contacts.
- Select the checkbox next to each Contact.
- The "Assigned To" user from the Sales Order is also displayed as a selection in the Contacts list, check this box to send a copy of the email to the user.
- Enter additional email addresses in the text box if desired. Separate multiple email addresses by a semicolon.
- Click "Email PDF" to email selected recipients.
- Create an Invoice to bill the customer if customer has not yet Paid using the "Create Invoice" button.
- This will create an invoice in the system that can be found under the "Invoices" tab and generate an Invoice PDF file that can be emailed to the customer directly or saved as a file.
- Once the invoice has been created, this button changes to "Print Invoice" if you want to generate the PDF file again.
- If emailing directly to the customer, the email template that is used can be found in "Settings > Templates > Email Invoice". This template can be customized in the HTML editor section of the template (Enterprise and higher editions only).
- To email the PDF file, select "Email Template" to email the Account and/or related contacts. Follow the same instructions from above to add email recipients.
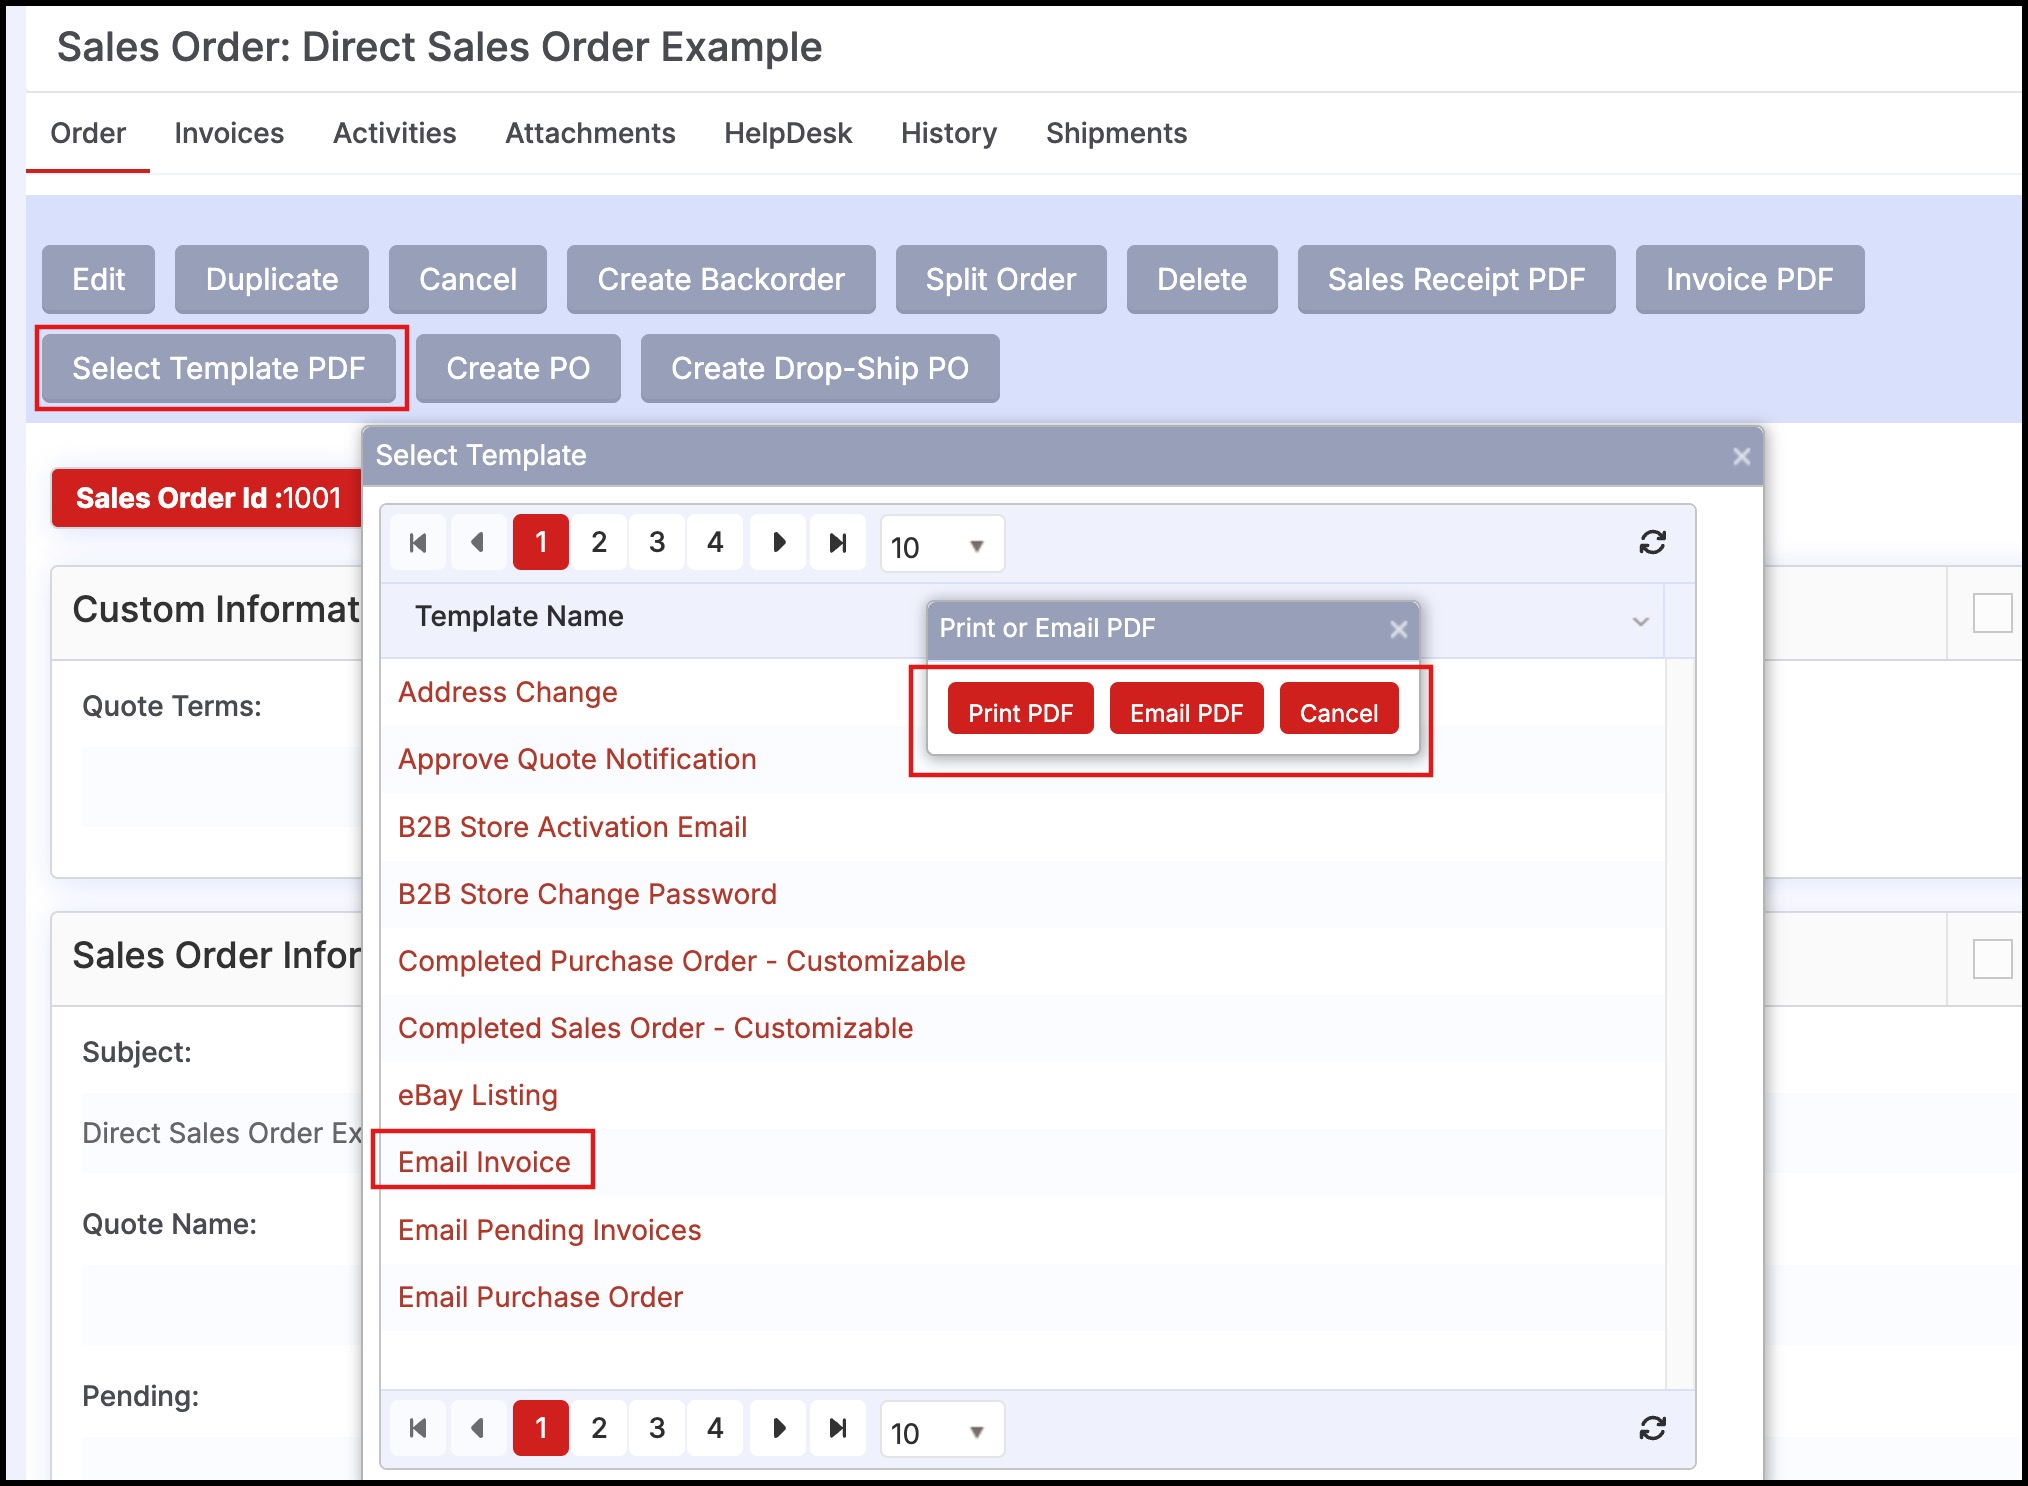
- Select an alternative template to print/email customers using the "Select Template PDF" button.
- Select a template from the list, using the arrows to scroll through the available templates. Custom templates created under Settings > Templates will appear here for selection. (Template customization available in Enterprise and higher editions only)
- Select Print PDF to print the template.
- Select "Email Template" to email the Account and/or related contacts. Follow the same instructions from above to add email recipients.
- Create a Purchase Order using the "Create PO" button to create a purchase order that contains the products on the sales order.
- Create a "Drop-Ship PO" to create a drop ship purchase order containing the products on the sales order. The customer's shipping address will appear on the PO in the "Deliver To" section.
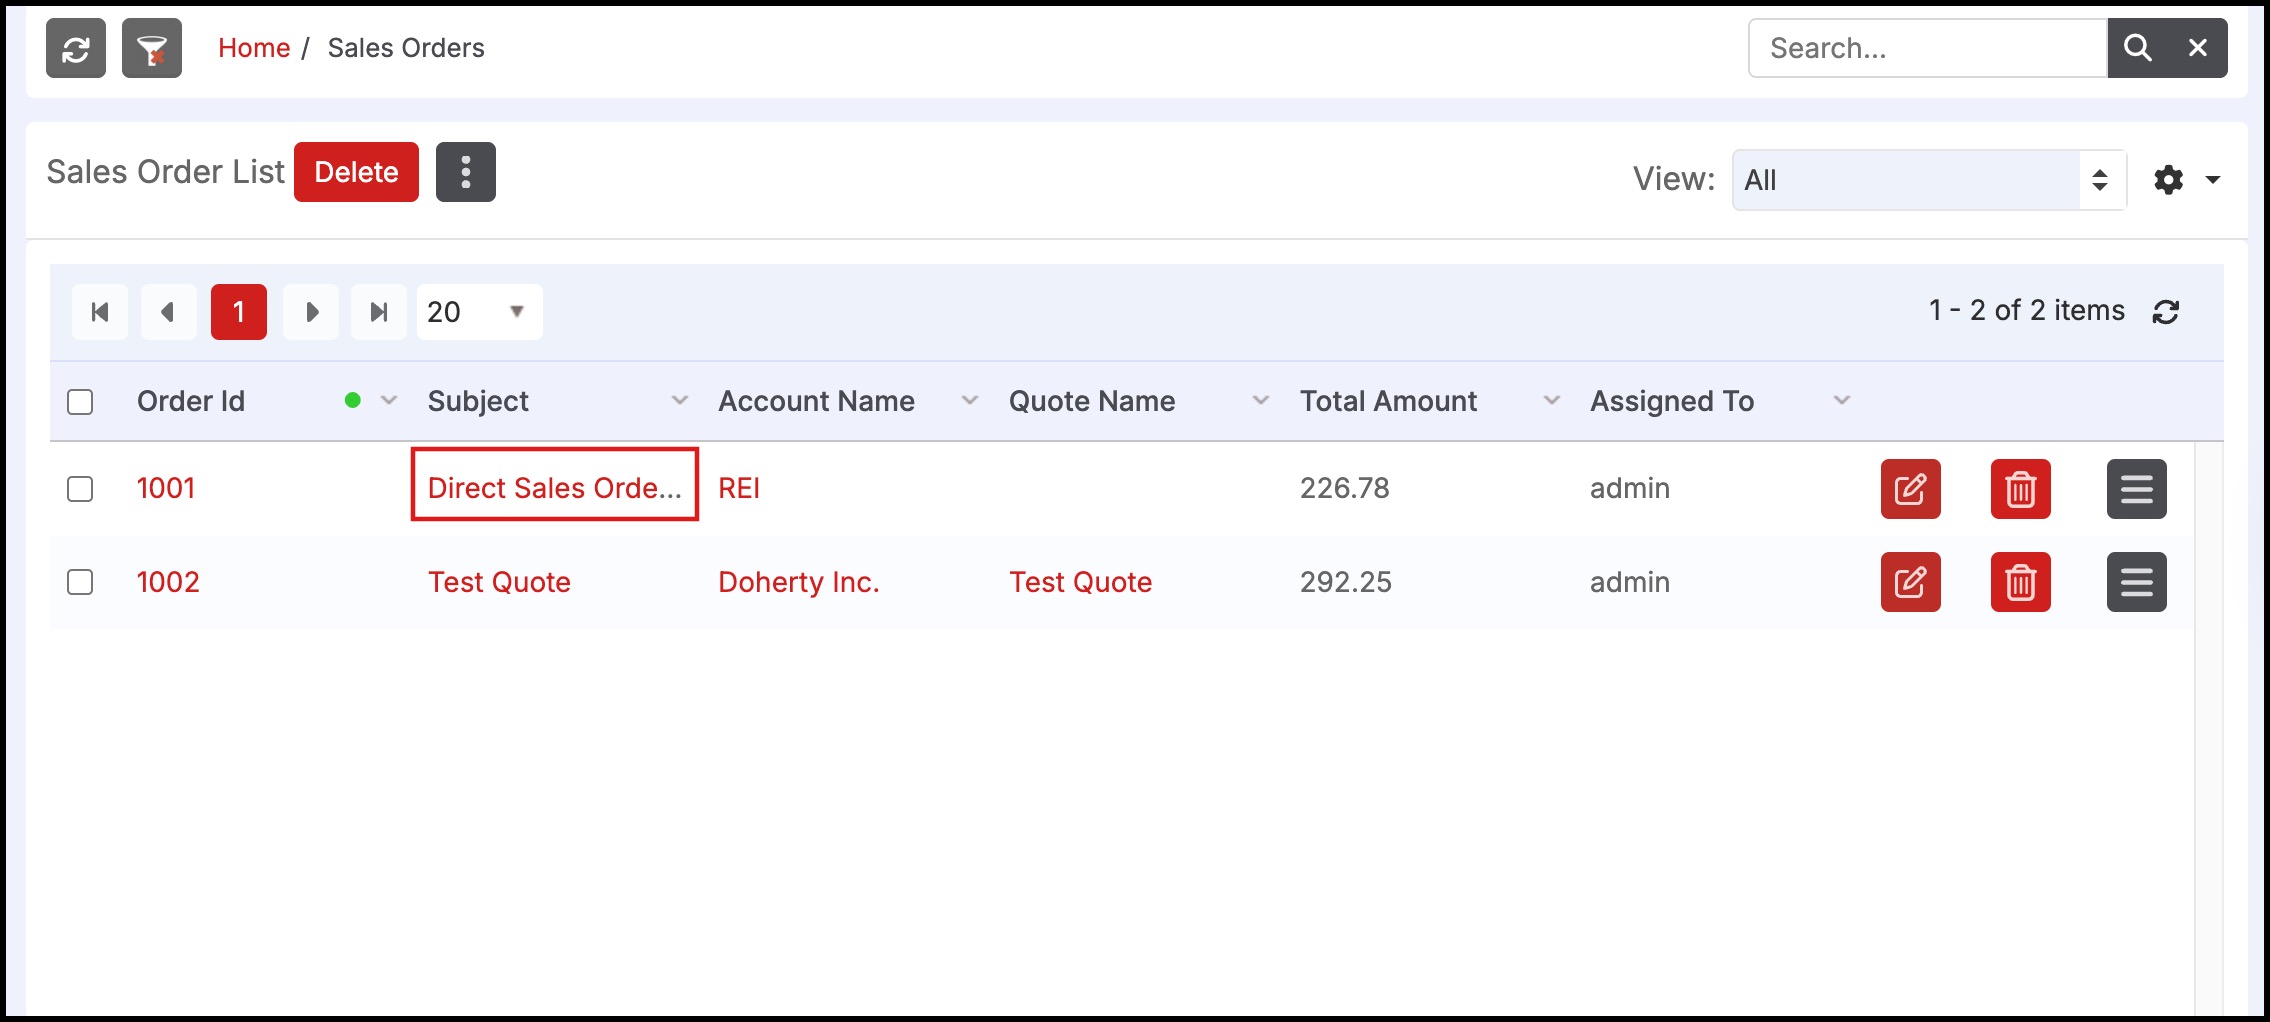
Once the sales order has been saved, it can now be found under the "Orders" tab under "Sales Orders".
Additionally, once an order has been Shipped, the button selection will change.
You can then:
- Create a Sales Return for an order that has been "Shipped" using the "Create Return" button (if the order has not "Shipped" the "Create Return" button is not available).
- This will bring up a Sales Return form with all the fields filled in from the Sales Order. You can make any changes there (including the handling of which products are being returned, which amounts will be refunded etc.) and save the return. This will then be found under the "Orders > Sales Returns" tab and the "Shipping & Receiving > Receiving" to receive the merchandise back from the customer.
- Print a Packing Slip using the "Packing Slip PDF" button.
Updated about 1 year ago